
And so I have shared a few of my "go-to" styles for when Jelly wants to look a bit 'fancy' as she calls it and time is most definitely ticking on. I'm awful at doing hair at the best of times, and Jelly's hair is the exact opposite of mine (much thicker) so everything I thought I knew about hair has had to go out of the window since I started getting her ready for school. But I think these styles are pretty versatile, they'll work medium hair and longer (I have nothing for a pixie cut I'm afraid) and, on this first week back at school for most of the country, they're a bit of inspiration - because lets face it, you're definitely not going to feel inspired this week.
I created this 'school run' collection for children because they're simple, quick styles that don't require heat or hairspray/gel. Feel free to do these on your own hair for the school run too - just try not to match your child. Embarrassing, Mum!
Let's Twist Again...

1. I start this hair by separating off the front sections - I clip the one I'm not working with so that it doesn't get mixed in with the hair. Jelly's hair naturally parts to the side but this will actually probably look better with a central parting so just go with whatever's natural!
2. Twist the hair in towards the head, pulling it back so it isn't too loose. Hopefully your child won't hate having their hair done as much as mine does, hence the face!
3. Clip it down securely and do the same with the other side. Easy! Olaf optional.
4. Your finished product should look like this. It literally takes no more than two minutes, but it shows you made an effort.
Is it a plait or something Elsa?

1. This style requires a side parting. Again, start by separating off that front section - this time, though, just do one side.
2. Start french-braiding backwards. Take extra hair from the other side of the head. This can be a bit fiddly if you're not used to french-braiding. There are some tutorials to get you started here and here, but basically plait like normal - each time a middle piece becomes an outside piece, grab a chunk of loose hair so that it becomes part of that piece. Does that make any sense?
3. Carry on until the hair above and below the plait has ran out. Try and keep it tight as you go along - mine ended up a bit loose and messy. Like I said, rubbish at hair!
4. Once the hair has ran out, finish with a regular plait for the remaining length of hair and secure it with a normal bobble (or whatever you fancy!) I think this is quite a good style because it took less than four minutes and screams 'Elsa'. Every Elsa fan is going to be in love with this quick and easy style.
Twist that pony!
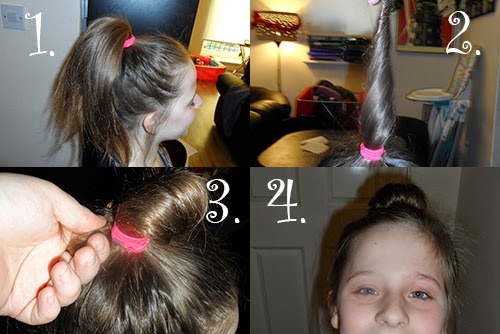
1. Create a ponytail as high as it will go. I find tipping the head upside-down helps if the hair is freshly washed and a bit less co-operative. You want it so high that the top of the pony stands right up.
2. And now on to the weirdest and worst quality photo I have ever taken. Twist that pony!
3. Start to wrap your twisted pony around the hair band - this is why it's important that it's high, as there's more structure for you to work with.
4. Once it's all wrapped around nicely, fluff it out a bit to fill any gaps and cover the hair bobble, then use another bobble to secure the whole thing. We often use a hair doughnut for this style but we couldn't find it today!
Schooltime Sassy

1. We use the ponytail from the ballerina bun to begin this style. Make your pony nice and high.
2. Choose a chunk of hair from anywhere in the ponytail.
3. Wrap it evenly around the hair bobble, covering all of it.
4. When you reach the end of the chunk, simply use a kirby grip to pin it in place. This is Jelly's favourite style because it's the most 'fancy' apparently. And probably one of the easiest, so win-win!
I hope that helped you, Mum in a School Morning Crisis. Do you have any go-to hairstyles for fancy kiddies on school mornings? Let me know!

No comments:
Post a Comment